Today we will learn how to merge accounts, customers, vendors, and more in QuickBooks Desktop for Windows and Mac with the help of QuickBooks Desktop Support Phone Number.
Users need to type the same item twice, but with different names? No need to worry, they can merge duplicate entries and keep their lists accurate. We’ll show you how.
| Before you begin: Need to back up your company file in QuickBooks Desktop for Windows or Mac. Need to switch your company file to “Single User” mode. You can clear any pending accountant changes. You need to ensure multicurrency isn’t turned on in QuickBooks Desktop for Windows. You need to ensure the vendors you want to merge aren’t: Tax authorities Tax exempt Paid through online banking Direct deposit vendors |
QuickBooks Desktop for Windows.
In order to merge entries in Chart of Accounts, Item List, Customer List, and Employee List
- First of all, navigate to the list that has the entries you want to merge.
- Next, copy the name of the entry that user want to keep.
- Click on right of the entry which you don’t want to use, then select Edit.
- After that, paste the name you copied, then select Save & Close.
- Say Yes to merge the entries.
Note: (For Chart of Accounts) In case, if user get a message that says “You cannot merge an account that has online information associated with it into another account”, user have an active bank feed on one of the accounts. Here’s how to turn off bank feeds via visiting our website wwwquickbooksupport.net.
In order to merge Vendors List entries.
QuickBooks Desktop for Windows 2019.
- (QuickBooks Desktop Accountant Edition) First of all, navigate to the accountant menu, select Client Data Review, then Merge Vendors.
(QuickBooks Desktop Enterprise) Navigate to the Company menu, then click & select accounting tools, then Merge Vendors.
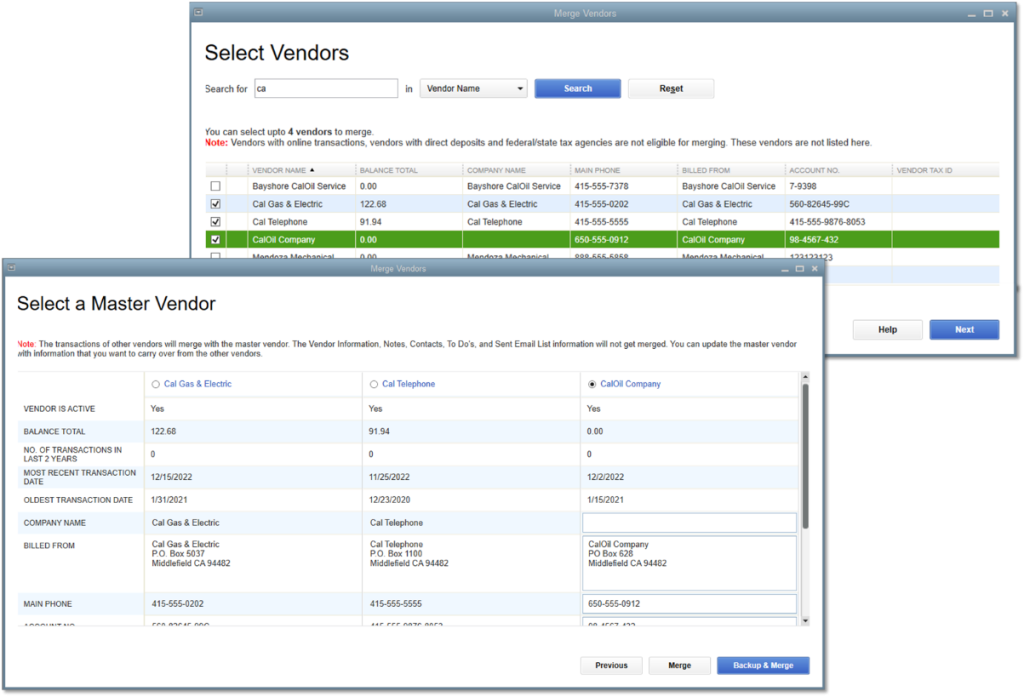
- Now you need to choose the vendors you want to merge, then select Next.
- After that, click & select a Master Vendor, then Merge.
- Click on Yes to merge the vendors, then press OK.
QuickBooks Desktop for Windows 2018 and below :
- First, navigate to the Vendors menu, click & select Vendor Center.
- Next, copy the name of the vendor you want to keep.
- Click on right of the vendor you don’t want to use, then select Edit Vendor.
- After that, paste the name you copied, then press OK.
- Say Yes to merge the vendors.
QuickBooks Desktop for Mac.
In order to merge entries in chart of accounts, Item, Customer: Job, Vendor, Employee, and Other Name
- First of all, navigate to the list that has the entries you want to merge.
- Next, copy the name of the entry you want to keep.
- Click & select the entry you don’t want to use, then click & select the pencil icon to edit it.
- Now paste the name you copied, then press OK.
- Click on Yes to merge the entries.
Conclusion:
The above given solution will be helpful for users to know to merge accounts, customers, vendors, and more in QuickBooks Desktop for Windows and Mac with the help of QuickBooks Desktop Support Phone Number. In case, if you feel any query, please feel free to get in touch with our experts via call or you can also initiate a chat via visiting our website www.quickbooksupport.net or in other cases, you can also draft a mail to us at support@quickbooksupport.net.