In this article, we will discuss how to properly configure the sales tax with the help of QuickBooks Desktop Point of Sale Support. If you do so, then you can charge sales tax on taxable items automatically in QuickBooks Desktop Point of Sale. Users need to follow the following below given steps:
Users may apply a single rate tax to all taxable items in QuickBooks.
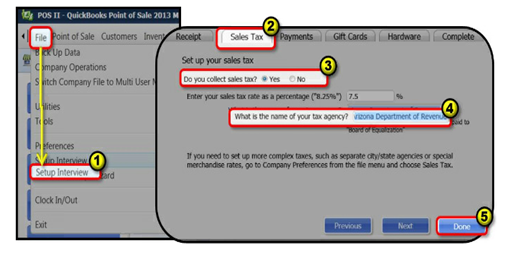
- First, click & select Setup Interview from File menu.
- Next, navigate to the Sales Tax tab.
- Select Do you collect sales tax, then press yes radio button.
- Type the tax rate as a percentage and the tax agency and then select OK.
Users need to set up and configure your sales tax rate
Step 1: Users need to specify that you collect sales tax

- First, click & select Preferences > Company from File menu.
- Open I want to option, & then select Sales Tax.
- After that, click & select the Collect Sales Tax checkbox.
Step 2: Users need to set up sales tax location
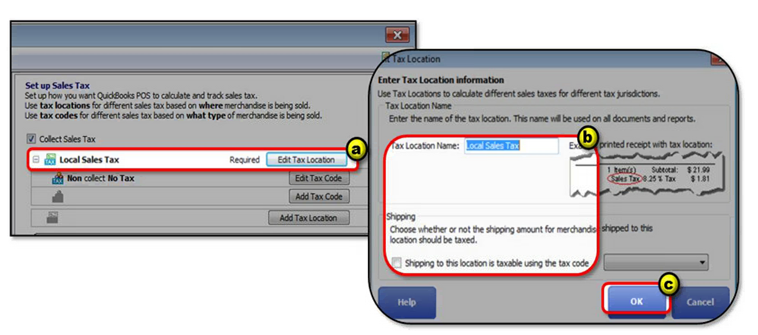
- First, click & select the Add tax location or Edit tax location button. It cannot be removed but user can rename or edit to specify their preferred location name.
- Type the tax location name from the Tax Location window.
- At last, press OK.
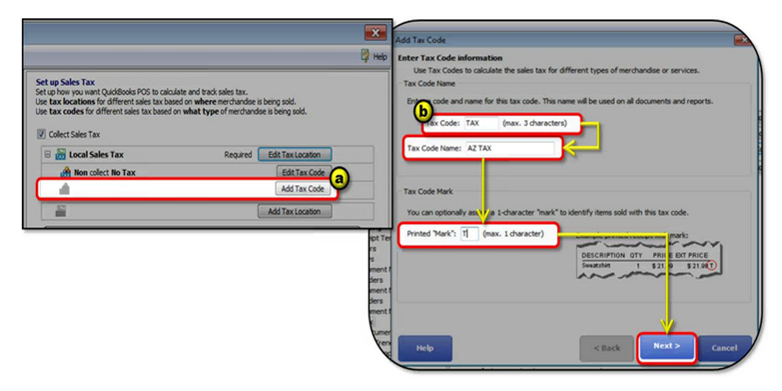
Step 3: Users need to add tax codes
Edit tax codes
- First of all, click & select Add Tax code or Edit tax code within a tax location.
- Next, you can type or edit the Tax code and tax code name.
Users need to edit tax calculation
In order to specify tax rates, users need to select any of the following options:
For single-tax rate
Users can use this to collect the same tax rate for all items at all price ranges in case of single-tax rate.

- First, click & select Single-rate tax and then select next from the Tax Option information.
- Next, type the sales tax rate as a percentage.
- After that, click & select Finish.
In case of price-dependent single rate tax
Users need to use this if they want to collect tax only when the unit price exceeds a certain threshold in QuickBooks.
- First of all, click & select Price-dependent single-rate tax, then select next.
- Open and fill your tax rate in enter your tax rate as a percentage field.
- Now type the name of your tax agency.
- When tax should be collected, & then type the unit price threshold.
- Select Apply taxes only to the amount over the unit price or shipping threshold box in order to calculate tax only to the exceeding amount of the unit price threshold.
- Click & select Finish.
For multi-rate tax
Users need to choose this option if they are going to collect multiple tax rates based on item unit price and collect different rates for multiple taxing agencies with the help of QuickBooks Support.
- First, click & select Multi-rate tax from the Tax Option information, then select next.
- Now, type the applicable information in the Tax component (tax name), Tax agency and Tax rate fields,.
- Click & select the Apply this tax rate to a specific item price range and type the applicable price range.
- In case, if the rate applies only to that portion of the item price that falls within the specified range (as opposed to the entire item price), then you need to check the Apply tax to the amount if an item’s price within the range.
- Click & select the Add another
- Tax Rate button and repeat for each rate component of the tax code.
- Once all components defined, select Test to type sample prices and ensure the tax rates are applied correctly or not.
- Once it gets done, click & select Finish.
Step 4: Users need to assign tax codes to inventory items
In order to collect the correct tax amount on your inventory items, you need to assign the tax codes defined in solution 3.
- First, click & select Item list from the Inventory menu.
- Next, choose the item you want to assign with a specific tax code.
- Now, you can add new item or select the item you want to make taxable, then select edit.
- Then go to the tax field from the Basic info section and then select the appropriate tax code from the drop-down list menu.
- After that, click & select Save.
Conclusion:
We really hope that the above given information will be help for users to know how to configure the sales tax with the help of QuickBooks Desktop Point of Sale Support. Still, if you are getting any issue then immediately you can contact our QuickBooks Point of Sale experts over a direct call via visiting our website www.quickbooksupport.net. users can also draft a mail to us at support@quickbooksupport.net.